
When shopping for an engagement ring, you’ll likely be bombarded with options. Depending on where your shopping takes you, you’ll see a range of ring styles from finished pieces, which mean they are ready-to-wear, to rings that are called “semi-mount” rings, which mean that it’s in an unset condition (no stones). Lastly, you may come across a jeweler (like Soha Diamond Co.), who specializes in custom made-to-order engagement rings and wedding bands, which means that the ring is not only made to your liking, but it’s made with the time and attention deserving of life's biggest moments. It’s likely that there are going to be example pieces like prototypes and computer generated images that you can refer to, but you won’t be able to actually see the finished piece before production is complete. This begs the question, will it be what I expected? Will I love it?
Enter 3D printed wax models (or resins). You may have heard this buzzword in the last decade or so with the onset of more availability and access to 3D printing from home. A 3D printed wax model is exactly as it sounds, it’s a three dimensional “pre-production” version of your future engagement ring or wedding band.
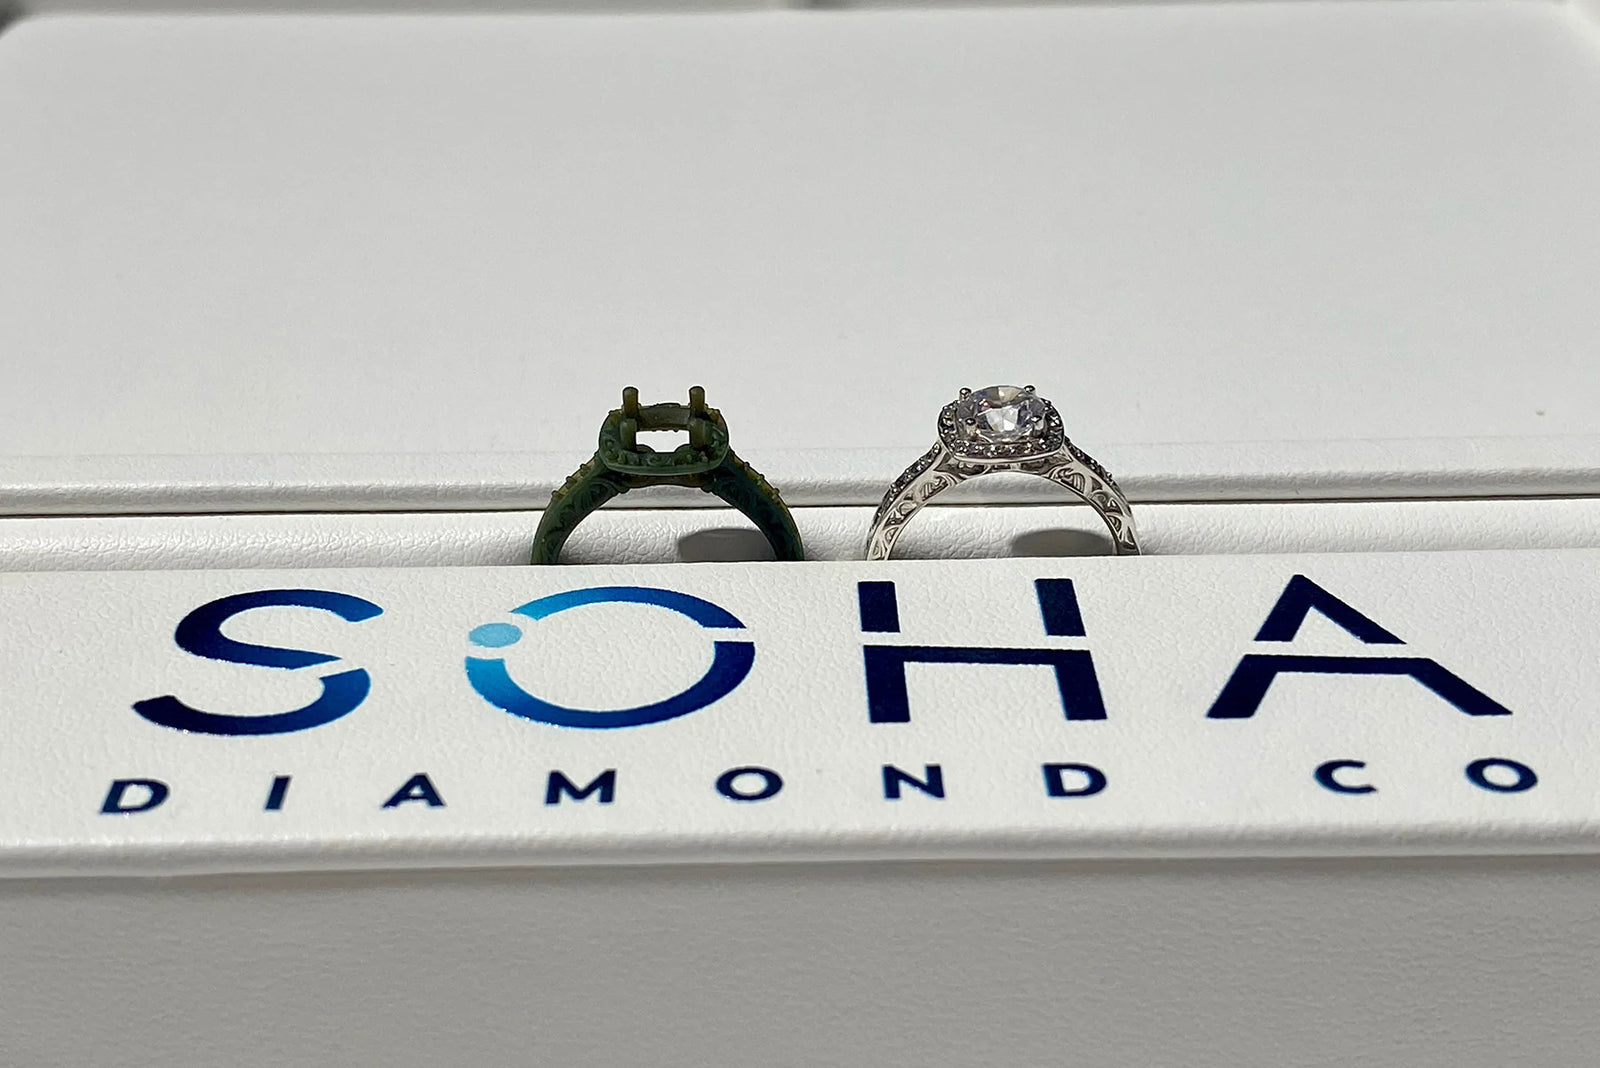
How custom jewelry works is that the design is composed of a digital file where the ring is built in a jewelry specific design software where it can be viewed on a monitor in three dimensions (think of spinning the ring on a computer and zooming in). Once the initial ring is designed, it can be further modified to manipulate aspects of your choosing and thus will depict to its most accurate pre-production representation what it can look like before casting the piece in its raw form. After the design is finished on the backend software, we can initiate a process to export it to a 3D printed wax model that quite literally “grows” the wax resin to the exact specifications of the design file. This process involves using a commercial grade 3D printer capable of rapidly printing high quality and accurate representations of even the finest of detail featured in your engagement ring or wedding band. For example, even the vintage inspired scrollwork of the example photo below appears in the 3D printed wax model. Some of our wax models even depict the accent stones filled in each of their respective positions. All of the above ensures that you have the confidence you deserve before heading into production.

A 3D printed wax model is most beneficial when you don’t have an example piece of fine jewelry to compare or base your ring off of. Otherwise, the best example may already be a version of your ring in a finished piece or prototype piece that’s arguably more accurate in terms of its post-production look and feel.
The benefits of growing a 3D printed wax model are that you’re able to quite literally touch, feel, hold, and even try-on the wax model to view its proportionality in relation to your hand and areas of the body that the piece will interact with. For example, being able to see how wide, thick, or tall the ring looks on your hand will give you a great idea of what to expect when the piece is set with your desired center stone and finished.
Many of our clients have expressed that the wax model is a little tight on their finger when trying it on. This is a common occurrence as the wax model is a pre-production version of the finished piece which means it’s produced to represent the most raw form the ring will be in before it’s cleaned up, set with stones, and polished before completion. A small percentage of the metal will get polished away on the band, so the wax model may feel tight, but the finished piece will be less so.

Our client often asks us how accurate the wax model is and we’re happy to report that a modern day 3D printed wax model is about 98% - 99% accurate in terms of being like the finished piece. The small tolerance is reserved for variations in the printing/growing process, specific wax used, and intricacy of detail that either is a part of the piece or needs to be attended to by our bench jewelers by hand. I would confidently say that other than the prongs standing upright, there is little to no way to differentiate the differences between a pre-production 3D printed wax model and the actual casted piece as it moves through the production process.
When we say “pre-production” it’s in contrast to “post-production” which otherwise means a completed ring. The pre-production form of a 3D printed wax model is most noticeable for the fact that the centerstone prongs are upright like the photo examples shown. This is due to our design software where the file was created and modified exports the file to the printer in the same format as when we go into production, meaning that the piece is not quite the beautiful piece you’ll come to expect upon completion, but one that is efficiently created with the production process in mind. The reason the prongs are standing upright is because after the casted piece is cleaned and set with stones, each prong is notched and carefully positioned (bent) into place to secure the stone. It wouldn’t make sense to cast the piece the other way around.
Due to the nature of a 3D printed wax model or resin, it’s important to realize that the example is quite fragile. The color may vary, but the actual piece can be broken with a moderate amount of pressure. Thus, it’s not meant to be worn and used like the finished piece which is made of precious metals. Though many clients have informed us that due to their excitement they’ve worn the wax model on a daily basis around the home in anticipation of the finished piece.
We advise clients to take advantage of the opportunity to experience a 3D printed wax model of their custom ring when they make modifications that will be noticeably different than an example on site. For example, if the design of a ring has been modified to add additional design elements or if you’ve dramatically altered the proportions of the ring then it’s a great idea to grow a wax model. Conversely, if the design changes are subtle and minor enough, then it may not be necessary to grow and review a wax model as the prototype on-site may be enough of a preview to move right into production.

The actual printing of a 3D wax model or resin does take several hours, on average, a standard “build time” may be around seven hours depending on the intricacy of the ring or jewelry design. The more intricate and detailed design file, the longer the printing process takes. Some designs can take upwards of 20+ hours to grow. We usually quote several business days in order to set proper expectations of when you can view the wax model in person. For clients out of state, we do offer to ship the wax model to you so you can view at your own leisure.
When the time comes for you to design the engagement ring, wedding band, or fine jewelry of your dreams, then you’ll know more about the benefits and process of growing a 3D printed wax model.